Roof Repair
Roofing

Final Inspect of Roof Repair

Depending on the extent of the damage, roof repairs may involve resealing leaky spots, reinforcing structural elements, or addressing underlying issues like poor ventilation and insulation. After all repair work is complete, roofing professionals perform a final inspection to ensure that everything is watertight and secure.Roof Repair

Isolated roof damage is ideal candidates for repair — especially when it’s the result of weather or neglect. However, putting off needed repairs can lead to bigger problems down the road. Contact Roof Repair Christiana TN for professional help.

The shingles of a roof are the surface that protects the structure from moisture and weather. They’re made of several types, including asphalt shingles, wood shingles, and metal shingles. They’re often laid out in rows that overlap one another, which creates a path for water and moisture to drain from the roof into gutters. The integrity of a shingle roof depends on the proper installation and maintenance. This includes adequate ventilation and flashing to prevent moisture buildup, which can lead to leaks and rot. Flashing is needed at the joints of the shingle layer and at places where it meets or intersects other surfaces, such as chimneys, roof vents, and dormers. It’s important to use high-quality materials and ensure a watertight seal at these points.

Leaking roofs may have many causes, including damaged shingles or flashing, poor ventilation, and a lack of maintenance. Identifying and addressing these problems quickly can help prevent costly structural damage to the home. Often, a professional roofing contractor can conduct a thorough inspection and recommend the best course of action for repairs.

Shingles that are missing or curled indicate the need for repair or replacement. Missing shingles allow moisture to penetrate the roof and damage the insulation and interior structures. Curled shingles are more susceptible to wind damage and can become more brittle as they age.

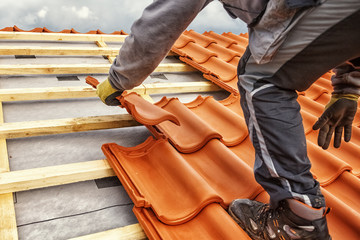
To replace a shingle, carefully lift the edges of the surrounding shingles and remove the nails holding them in place. Carefully slide the new shingle into place, positioning it just below the overlapping shingle above. Secure the shingle with roofing nails and cover the nail heads with roofing cement. If necessary, trim the new shingle to fit the surrounding area.

A shingle that has become curled can usually be straightened by applying heat to the shingle with a propane torch. After the shingle is softened, it can be flattened using a utility knife or other tool. For a shingle with cracked or broken edges, you’ll need to apply roof cement to the edges of the shingle and in any gaps. Inspect the entire roof for cracks, holes, and other signs of damage. Then, you’ll be ready for the next step in your roof repair — fixing the leaks.

Flashing

Flashing is a thin strip of metal installed around roof penetrations like chimneys, vent pipes, skylights, and dormers to prevent water leaks. It’s usually made of rust-resistant materials like galvanized steel or aluminum, and it is sealed to the surface of the roof and to the surrounding cladding with a waterproof sealant. Flashing directs rainwater away from vulnerable areas of the roof, where water leaks can cause major damage.

Leaks are caused by cracks and seams in the roof’s structure or where different sections of the roof meet or intersect with other structures, like chimneys, vents, or skylights. The most important function of roof flashing is to prevent these leaks by creating a protective barrier that keeps moisture from seeping into the cracks and joints in the roof. Without proper flashing, water would leak into the ceilings and walls of a home, causing significant damage over time.

Roof flashing is often a hidden component in a roof’s structure, but it is essential for keeping the house safe and dry. A trained roofing professional can identify and repair any damaged or leaking flashing to protect the interior of the home and avoid costly repairs down the road.

Flashing can be made of a variety of materials, depending on the needs of the project. Galvanized steel is the most common flashing material, and it can be clad with copper or aluminum for a more attractive look. Colored flashing is also available, which can be matched to the color of the roof for a seamless look.

When installing flashing, it is critical to ensure that the flashing is overlapping and sealed correctly. If a gap is left open, water will leak into the building and create mold and mildew problems. Flashing should also be carefully inspected after installation to ensure that it is not leaking or cracked.

Flashing can be repaired or replaced by a qualified roofing contractor, and it should always be done by an experienced professional. Do-it-yourself roofers should steer clear of roof flashing repairs, as the process can be complicated and dangerous.

Gutters

Gutters are a key part of home roofing systems and work with downspouts to collect rainwater and direct it away from the foundation. They are designed to prevent soil erosion around the house’s foundation, which can lead to settlement over time, compromising the structural integrity of the building. Gutters also protect roofs, fascia boards, siding and exterior doors from water damage and mold.

Often referred to as eavestroughs, gutters are metal or plastic pipes that are attached to the fascia board, perpendicular to the roof. They are angled slightly to channel water into downspouts along the sides of the house. Gutters can help preserve the foundation of a house by preventing water damage to basements and crawl spaces, which can result in thousand-dollar repairs. They can also reduce the amount of water exposure that damages the paint and stain on a house’s siding.

In order to properly function, gutters must be free of debris like leaves and branches, which can cause them to overflow during rainfall or back up into the shingles. This can lead to rust, rot and mold in the roof area, as well as damage to the walls of the house, its fascia, soffits and foundation.

To prevent this, homeowners should regularly clean their gutters to remove any clogs and debris. They should also check to make sure that the gutters are correctly pitched, which can be done with a level and a tape measure. If they find that the pitch of the gutters is off, they should hire a professional to correct it.

Whenever you need to repair or replace your gutter system, it is a good idea to do the job while the roof is off. This will allow you to inspect and repair the fascia, as well as any other areas that may have been affected by the storm or wear and tear. If you are unsure of how to go about doing this, contact a roofing contractor in Eau Claire, WI for assistance. Forever Exteriors offers trusted and reliable residential and commercial roofing services, including gutter repair and replacement.

Soffit

Soffits are an essential part of your roof system, covering exposed rafters to protect them from moisture, rodents, and mold. They are also vital for attic ventilation. If your soffits are damaged, it can lead to leaks throughout your house. This is why it’s important to inspect your soffit and fascia regularly and have them repaired when needed.

Soffit repair is usually simple and inexpensive, depending on the extent of the damage. Minor problems like cracks, holes, or peeling paint can be patched with wood filler or epoxy. In some cases, soffits may need to be replaced entirely. This is particularly true if you have noticed signs of extensive rot, water intrusion, or pest infestation.

When repairing or replacing a soffit, you’ll need a variety of tools and materials. A hammer or screwdriver is useful for removing nails that are holding the soffit in place, and a tape measure is crucial for making accurate measurements. You’ll also need a ladder, power drill, soffit board, tin snips, and a crowbar or pry bar.

If you’re repairing wood, vinyl, or aluminum soffits, make sure that you use weather-resistant materials. You can also choose to replace your soffit with fiber cement, which is more durable than wood or vinyl and has a beautiful finish that matches your siding.

Using the right tools will make your soffit repair job easier and faster. A tin snip or utility knife is helpful for cutting through rotted sections of the soffit. A soffit panel is typically cut into sections the width of your eaves, so you’ll need to cut each section as close to the house as possible. When installing the new soffit, be sure to nail into the fascia boards rather than the rafter tails.

If you’re concerned about your soffit and fascia, it’s a good idea to contact a trusted roofing company for inspection and repair services. They have the experience and knowledge to diagnose all sorts of roofing problems, from leaks to rot and insect infestations. They can also recommend preventive measures to help keep your home in tip-top shape.

Landscape Lighting
Landscaping

Landscape Lighting Repair Tips

A well-maintained landscape lighting system adds allure and value to outdoor living spaces. Periodically reevaluate and adjust lighting to accommodate changes in the landscape and property.Landscape Lighting

Blown bulbs and faulty connections are common, but a light that won’t turn on points to more significant issues like corroded wires or a failing transformer. A professional inspection and repair service can identify these problems quickly and restore functional lighting. Contact Landscape Lighting Repair Orlando for professional help.

Landscape lighting adds a beautiful ambiance to your garden and yard at night. It can also increase the curb appeal of your home and boost its value. To get the most out of your landscape lighting system, it’s important to keep up with routine maintenance. These simple tasks can help you avoid costly repairs and enjoy the best possible results from your system.

A good way to start your maintenance is with a walk-around of all the lights. Flip the switch on and off and look at each fixture for signs of damage or wear. If you notice a light isn’t working, check the bulb to see if it needs replacing. It’s also a good idea to replace the bulbs on an annual basis. LED bulbs last longer and use less energy, so they can save you money in the long run.

Next, inspect the fixtures themselves for rust or corrosion, especially around the wire connections. These wiring connections are how electricity reaches the lights, so any damage can cause them to stop working or even be a safety hazard. If you’re noticing signs of these problems, it’s a good time to consider upgrading your landscape lighting system to a newer model. Lighting technology has come a long way in recent years and today’s systems perform much better than older models.

Another step in maintenance is to clear away any debris that has accumulated on or near the fixtures. This can include things like fallen leaves, mud and dirt, cobwebs and wasp nests. This will help keep the fixture from corroding or being blocked by anything.

It’s also a good idea to trim any tree branches, bushes and other plants that are growing too close to the fixtures. This can prevent them from being covered or damaged by mowing equipment and reduce the risk of power lines getting cut. In addition, it’s a good idea to keep a list of the locations where the lighting is located so maintenance crews can easily locate them when they’re working in the garden or yard.

Wiring and Connections

Lighting systems use a complex network of wires to distribute power and provide illumination. Wires need to be able to withstand outdoor elements, including moisture and dirt, as well as the potential for being pulled out by animals or landscaping activities. Low-voltage wires must also be buried deep enough to prevent accidental damage during landscape or gardening activities and to protect against ground movement and weather changes that could disrupt or cause a short circuit.

Keeping all of these components in good working order requires periodic maintenance and inspections. A regular professional cleaning of fixture lenses and other surfaces can help keep them looking their best, while a careful examination of wiring and connections can detect any corrosion or problems that may need immediate attention.

Flickering Lights

Several issues can cause flickering lights in your landscape lighting system, from a simple burnt-out bulb to a faulty transformer. A professional can help you determine the source of the problem and make the necessary repairs to restore full functionality.

Lights that Won’t Turn On

If one or more of your landscape lights fail to turn on, it is a sign of a larger electrical issue. It is important to have these problems addressed as quickly as possible to minimize the impact on your home’s safety and security.

Faulty Timers and Transformers

If the timing settings on your landscape lighting system are incorrect, it can result in a lot of wasted energy or even system shutdown. A trained technician from NightVision Outdoor Lighting can ensure that these crucial controls are functioning properly and identify any potential problems.

Dimming Lights

As your landscape matures, it is common for some of the lights in your landscape to become dimmer over time. This can be caused by a variety of factors, from dirt or mineral deposits on the fixture lenses to low voltage from aging bulbs.

A well-lit property improves safety and security by reducing the risk of trips and falls and deterring unwanted intruders. It also makes your property more appealing by highlighting its best features and enhancing the overall aesthetic. Regular landscape lighting maintenance and repair services from an experienced and qualified technician can maximize the benefits of your investment and ensure that your lighting system performs at its peak.

Transformers

Landscape lighting can elevate a home’s curb appeal at night, creating a warm and inviting atmosphere. But when fixtures stop working, it can be frustrating and even a safety risk. Effective landscape lighting repair practices can restore your outdoor glow.

Electrical problems are often the source of malfunctioning landscape lighting. Faulty wiring, which can be caused by exposure to the elements, rodents chewing on wires, and accidental damage from lawn care equipment, can cause lights to flicker or stop working. These issues can be difficult to diagnose and require professional services.

Inspecting your fixture components on a regular basis helps prevent them from becoming damaged or broken. Start with inspecting the lenses and housings for signs of deterioration. Look for cracks, loose connections, or any evidence of water infiltration, which can lead to rust and electrical short circuiting. Clearing any dirt, debris, or cobwebs from the fixture can also help ensure that the light is functioning properly.

Another common problem is a low wattage output, or “lumens.” A light’s lumens are a measure of its brightness. When replacing bulbs, choose those with a similar wattage or your landscape lighting may not shine as brightly.

Low-voltage transformers are crucial for landscape lighting systems, converting household voltage to a safer, lower level for outdoor illumination. These units are rated in kVA, which combines real power (kW) for actual use and reactive power (kVAR) used by motors and inductors. When a transformer is overloaded, it will begin to overheat and shut itself off.

While a quality landscape lighting system is designed to last for decades, normal wear and tear or electrical problems can cause it to need repairs or upgrades. Upgrading to newer lighting components, such as transformers and wires, improves efficiency, reliability, and performance.

Effective landscape lighting repair and maintenance practices can prevent costly repairs, extend the lifespan of your fixtures, and ensure a safe and enjoyable experience. Learn more about the best landscape lighting techniques and tips by contacting the experienced professionals at NightVision Outdoor Lighting today. We’ll help you find the perfect solutions for your unique lighting needs, providing a picture-perfect evening glow that enhances your home’s beauty and value.

Tools

In order to repair landscape lighting, homeowners must first make sure they have the right tools on hand. A good start would be a six to ten piece screwdriver set that includes nonslip handles. This should work well for most brands of lighting. Additionally, a multimeter is a helpful tool to have for assessing voltage drop, inspecting wiring and switches, and measuring the quality of connections. Having insulated tools is also essential to prevent electrical shock when working with electrical components.

Once you have the necessary tools, it’s time to begin troubleshooting. Before beginning any repairs, make sure the power is completely off at the transformer. Then, walk around your yard to check each light fixture to ensure that it is operating correctly. If a fixture is not working, turn it off and try resetting the fuse or replacing the bulb.

If the problem persists, it may be a good idea to switch out older bulbs for LED bulbs. These are energy-efficient and last much longer than traditional bulbs. If you decide to replace your bulbs, make sure they are the same wattage and color temperature as the originals for uniform lighting.

Other common issues include clogged fixtures and wires that are not properly connected. Inspect each fixture regularly to remove any dirt and debris that could be causing them to stop functioning properly. Also, consider upgrading your system with newer technologies that can save you money and improve your safety and security.

Keeping your landscape lighting in good shape is a simple process with the proper knowledge and tools. With regular cleaning and inspections, you can avoid many problems that might otherwise be difficult to fix. By knowing what types of problems are most common, you can keep your system in top shape for years to come.

Whether illuminating pathways, accentuating architectural features, or creating a warm ambiance for evening gatherings, the right landscape lighting can add a magical element to any outdoor space. But if the lights go out or are flickering, all that beauty is lost. Luckily, many of these problems are easy to diagnose and fix. With a little know-how and the right tips, you can keep your landscape lighting shining brightly all year round.